
How To Make A Kids Table

This is a very simple and easy DIY Kids Table to make. I was selling a dining table on craigslist and the customer that purchased the table also asked me to build a small farmhouse style kids table for her 1st-grade class. Follow these steps to make this table
- Cut and Assemble Boards for Table Top
- Attach the Breadboards
- Measure, Cut, and Assemble Side Boards
- Attach 2x4s to Table Top
- Cut and Attach 4x4 Legs
How to Build a Simple DIY Kids Table

Kids Table PDF
$6.00
This PDF download includes Cut Diagrams, a List of Supplies, and 3D illustrations with detailed steps to build the project. Measurements are in imperial and not metric. Does NOT include SketchUp/CAD files.
The plans are embedded on the webpage for free, but if you would like to support the website, you can pay a small fee to purchase the printable PDFs.
Thank you for your support!
Kids Table
Note: Lumber dimensions are listed as nominal size. See lumber sizes for actual dimensions vs nominal.
Disclosure: Some of the links on this page as well as links in "tools for this project" and "material list" sections are affiliate links.
Dimensions

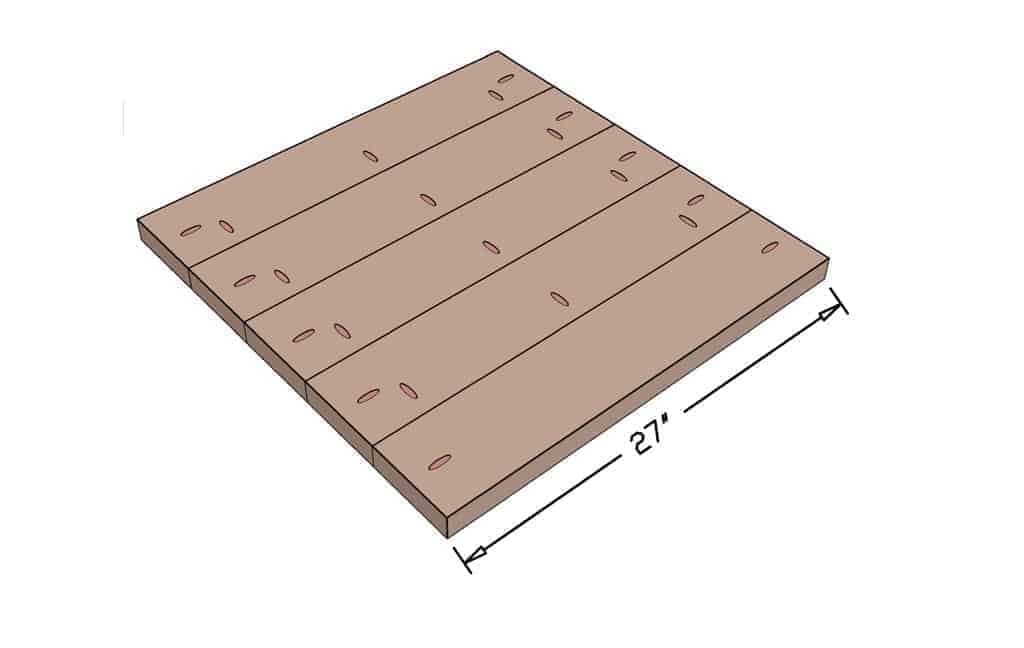
Step 1 – Cut and Assemble Boards for the Tabletop
For this project I'm using regular construction lumber from Home Depot. It's important to take some time and pick out the best lumber boards you could find, especially for the table top. Many times construction lumber is very rough with dents or twists. That's why its cheaper then other premium lumber.
Take 2x6 boards and cut 5 pieces to 27″ in length. Then with a table saw rip off 1/8″ on both edges of the 2x6 boards. This will remove the rounded edges and will make the tabletop flat without any grooves. Then set your Kreg Jig to 1 1/2″ wood thickness and drill pocket holes as shown in the picture. Next, apply wood glue between the boards and clamp all boards with a pipe clamp. This will prevent the boards from shifting when driving in the screws. Then attach the boards with 2 1/2″ pocket hole screws.
Step 2 – Attach the Breadboards
Once the top boards are attached, measure the total distance for the breadboard and cut 2x6 with a miter saw. Similar to step 1, rip off 1/8″ on both edges of the breadboard. Then apply wood glue and attach these boards with pocket hole screws.

Step 3 – Measure, Cut, and Assemble Side Boards
Now take 2x4 boards and cut two pieces to 35″ in length and two pieces to 21 1/2″ in length. Then drill pocket holes as shown in the picture. Connect these boards together with wood glue and 2 1/2″ pocket hole screws making a rectangle.

Step 4 – Attach 2x4s to Table Top
Center 2x4 rectangular frame over the tabletop. You should have a 1 1/2″ distance from the edge of the table to the rectangular frame all the way around. Attach the frame to the tabletop with wood glue and pocket hole screws.

Step 5 – Cut and Attach 4x4 Legs
Take 4x4 boards and cut four pieces to 21″ in length. Then drill pocket holes on the legs to attach to the tabletop. Apply wood glue on edge of the leg and attach to the tabletop with 2 1/2″ pocket hole screws. You are done with building the DIY Kids Table.
Paint or stain to your favorite color. I used Honey Stain for the top and white paint for the legs and the side. Make sure to pre-stain the tabletop before applying the stain. Pre-stain will prevent stain blotchiness.

Source: https://thediyplan.com/kids-table/

0 komentar:
Posting Komentar